Wednesday, May 22, 2019

Lift to music. Here is why!


How Can Your Workout Benefit From Music?

 Lifting to music has more benefits than just making your workout more badass. In a New York Times article, published in 2008, titled: They're playing my song: Time to work out, sport psychologist Costas Karageorghis explained how listening to music while working out can:


  1. Reduce your perception of how hard you are working by about 10 percent during low-to-moderate intensity activity.

  2. Profoundly influence your mood; elevating the positive aspects, such as vigor, excitement and happiness, and reducing depression, tension, fatigue, anger and confusion.

  3. Be used to set an appropriate warm-up, workout, and cool-down pace.

  4. Be used to overcome fatigue, and control your emotions if you're in a competition.

Exercise with Music = Stress-Reducing/Health-Promoting Duo


Exercise is perhaps one of the most effective stress-reduction strategies there is. And, with or without exercise, music is also a great mood regulator in its own right. Loud, upbeat music generally has a stimulating, energizing effect, whereas slow music can act as a sedative and have a calming, soothing impact on your mental and emotional state.


Other Health Benefits of Music

Harp music can be particularly helpful for individuals with heart issues, or suffer from pain or anxiety. Harp music has also been found to have benefits for premature infants. The Bedside Harp web site lists an impressive number of studies on harp music's impact on human health and well-being.

Interestingly, Harvard researchers have shown that the rhythms of healthy hearts may be similar to those found in classical music, and that certain rhythms (such as that of harp music) can train your heart to beat more normally.


In fact, Harvard has a nice web site dedicated to Music and medicine where you can read more.


Music therapy has also been shown to:


  • Improve motor skills in patients recovering from strokes

  • Boost your immune system

  • Improve mental focus

  • Help control pain

  • Create a feeling of well-being

  • Reduce anxiety 


Music and Focus


Another study mentioned by the New York Times was published last year. It discovered that listening to music could prevent basketball players from "choking" while under pressure to perform. 


They theorize that the music allowed the players a new focus; a distraction, "from themselves, from their audience and from thinking about the physical process of shooting," which freed their bodies to perform more automatically, without nagging interference from their own thought processes.

What kind of music do you listen to at the gym? What would you recommend to people looking to make a playlist? How else can music help you lift more efficiently and effectively? Leave a comment on what music you recommend or prefer!


Wednesday, May 15, 2019

Triangulated Power!


Today I want to go over something that will help ensure you are performing your clean's and snatch's to a better degree. If you're not into Olympic lifting, guess what!?! You can you this too as an athlete in order to better perform a major lift in the gym to accomplish true power and strength! Read through all this and apply it to your Power Cleans! 

 Look around you. Triangles are everywhere!  Any structure requiring a strong and rigid construction depends on triangles to achieve that goal.  Even though they might not be obvious or even seen for that matter, triangles are at work wherever strength and rigidity are important. This holds true even in weightlifting. Ask any coach what the "power triangle" is and he will gladly show you a person who has a developed set of shoulder blades, abdominal, and the glutes. However, today we are not talking about how to create a power triangle. We are here to discuss how to properly close the weightlifting triangle that has created the power and stability for your lift. 

Once you get past your knees in the initial pull, you should certainly have a triangle between your knees, shoulders and the hips. Can't imagine what I am talking about? Go ahead and grab a stick, bar, or just act as if you are holding the a bar. Go slowly thru the 1st pull and stop when the "bar" is just past your knees. Pause there and think. You have created a triangle. This position is important to form: The hips are away from the bar, the arms are directed back towards the thighs, and the chest over the bar forming 3 sides of a “power triangle.” In this position you are strong, stable and prepared to transfer the weight thru the 2nd pull.


This is where people make a big mistake. They either close the triangle to slow, to fast, or do not actually keep the bar in contact leaving a gap in the triangle. You may hear it at the gym as: completed a short pull, leaving the hips out, or not finishing with extension. Regardless how you are completing the pull, you are not closing the triangle in one way or another.  

The triangle stores a ton of potential power, the hips/glutes/lats are primed and ready to explode with force. You basically have to try in order to not create the triangle when the bar is above the knees. However, people often form the triangle correctly... but do not properly shut it.

Focus on driving your hips to the bar as soon as the bar passes your knees. Keep the bar close by utilizing your lats. Pull your knees under the bar with a dipping type movement, and then forcefully thrust your hips forward into the bar while simultaneously pulling the bar into your hips with the lats. DO NOT BEND YOUR ARMS!  Shut the triangle with control and conviction to get the most power into your clean or snatch. I however want to caveat this with one thing that will inevitably happen as you practice. Body position is always critical throughout any Olympic lifts. So... ensure proper body positioning at all times!. As you transition thru the 2nd pull your back/hips should move in conjunction with your knees. Neither should extend earlier than the other. If you extend your knees to early, you have no more room to explode upward. Same goes for your hips... if you open to early you will be leaning to far back and taken out of the proper power position as well as your bar path will be impacted. Either way, you are unable to create triple extension as intended or desired.


Practice closing the triangle at a slow pace with light weight. Gradually increase your speed as you get more familiar and are able to demonstrate proper positioning throughout the lift. Once you are moving in a fluid motion and able to maintain positioning, then move up in weight.

 As always, if you found this helpful, please leave a comment or email me. I am always looking to write what interests the readers, so have an idea of an interesting or debated topic , want to know something specific, liked a previous post and want it expanded upon? email or comment below. All feedback is greatly appreciated! 

Until next week... Lift it over head, slam it to the ground and repeat! Practice makes progression and progression to Gold!

Wednesday, May 8, 2019

Nitty Gritty

This week I wanted to focus on something that is going to lead you to success. I focus a lot of weightlifting itself, but I wanted to get a post in about mentality and how it can help make you more successful! So this weeks topic is mental mindset and its all about GRIT! Do you have it? Do you know what it truly is? Well read on and find out what it is and how you can benefit from it!  


Imagine yourself out for a jog when you are presented with a steep hill. You could turn and forgo the hill. Or you could dig deep inside yourself and find your strength and energy to tackle that monster. If you chose to charge over the hill, most likely you’ve got grit—the tenacity and stamina to put in hard work in pursuit of a goal, despite obstacles or setbacks. While talent and skills are important for getting ahead, grit is actually the biggest predictor of how successful you’ll ultimately be, according to Angela Duckworth,author of Grit: The Power of Passion and Perseverance.


So… How do we develop or nurture our grit? Whatever your Grit level is currently, you can build more anytime. The following will aid in your desire to grow your grit. Or follow these 5 steps from theweek.com.


First, find something you are truly passionate about.

Do you love to run or bike? Maybe consider training for a triathlon.  For me its weightlifting... hence the blog. If your passionate about what you’re doing, your grit will intensify, and you’ll be much more likely to succeed. You can also choose a goal that gives you a sense of purpose—becoming an instructor or launching a kids benefit, for instance. This can be especially motivating, because you see the effect your work has on other people. Maybe you just lack motivation. Try reading 5 reasons your motivation may be missing.


Next, focus on what you really want.

To reach a goal, it needs to be “SMART” Specific, Measurable, Attainable (Realistic), Relevant,Time Bound as well as challenging enough that you have to work toward it. For example, if your goal is to “become better at weight lifting," aim for something precise like ‘I want to lift my body weight in the Clean and Jerk.” 


Ensure you surround yourself with gritty people.

“We spontaneously model the behaviors of those around us,” Duckworth says. “When you join a team, you gravitate to its culture.” If you want to become a weightlifter but have a hard time getting in the gym and pushing yourself, find a group that meets every day to crush weights with. The members’ motivation and work ethic will rub off on you.


ALWAYS... Allow AND expect yourself to fail.

Failure sends most people’s confidence and morale plummeting. However, the thing about truly gritty people: they aren’t discouraged when they come up short. Its the opposite, they’re not only undaunted by adversity, but they are also fueled by it. OK, so how can you learn to embrace failure? Keep telling yourself that ability is not a fixed quantity. Anders Ericsson, Ph.D., a professor of psychology at Florida State University and a coauthor of Peak: Secrets From the New Science of Expertise says, “with practice and dedication, you can evolve and eventually become excellent at doing something you once found difficult.” 


Try to view setbacks as opportunities.

“Gritty people appreciate the work they put in on the way to reaching a goal, not just attaining the milestone itself,” says sport psychologist Gloria Petruzzelli, Ph.D. “For them, setbacks become chances to learn something and are simply part of the process of mastering a skill.” To help cultivate grit when things go wrong, ask yourself, “What am I learning about myself in this moment?” and “How can I use this situation to shape myself for the better?”


Lastly... become determined to never give up.

If you’re inclined to blow off soccer practice after a hectic day at work, remind yourself that you’re the kind of person who honors commitment! Or if you’re tempted to end your long-term goal of lifting your body weight in the clean and jerk, tell yourself, “I will not quit, I cannot quit, period,” Petruzzelli advises. “Thinking of yourself as a gritty powerhouse will help you believe—and achieve.”


Need more advice in order to never give up? Review these 7 tips.


So what will you do to determine your grit? How will you ensure you will not quit? How will this advise aid you in pursuing your goal? Leave me a comment letting me know how this information has helped aid you in your pursuit of greatness!


Until next week... Lift it over head, slam it to the ground and repeat! Practice makes progression and progression to Gold!

Wednesday, May 1, 2019

"Pause"itive Gains


Being explosive is a necessity in weightlifting. The unfortunate aspect of training for Olympic Weightlifting, however, is that often the simple foundational factor of strength is forgotten. Everyone focuses on form and power (which are also a necessity), how to move quickly, open the hips explosively and move the bar overhead in a smooth motion. That’s all great, but your form isn’t going to make up for the fact that you’re a weak A$$ Biotch!


So how do we become stronger?! Strength training... duh! "But this is Olympic Weightlifting." 100% true... so lets incorporate a technique that will still build on the lifts, but make gains on, gains on, gains!

PAUSE REPS!

Pause repetitions are a tried-and-true method of building muscle and strength and should be a staple in any training program. Pause reps are the opposite of ballistic or explosive training. Rather than seeking to take advantage of speed or the elastic components of our muscles, pause reps force you to face your lifts with strength and strength alone.

Pausing during any portion of the rep ensures the elastic energy has dissipated while simultaneously breaking your momentum. When completing pause reps, there is no stored energy to take advantage of, no kinetic energy to assist in lifting the weight. When you pause, it takes pure muscle to produce the force you need. No cheating... just pure strength.

Here is a video of a pause snatch to give you an idea of how this looks for Olympic weightlifting.


Some people go overboard with the pause, stopping for a full two or three seconds between reps. There is certainly some utility to this approach, but doesn't need to be used for Olympic Weightlifting. That's more of a powerlifting technique. That being said, you only need a small pause to get the advantages pausing provides. Just long enough (Say Pause in your head... that's long enough) that you know your momentum is broken and you are starting from a halted position. If you pause between 1-2 seconds, I am telling you now... getting the weight to move again is going to suck! However, this is how you know you’re doing it right.

Utilizing a pausing phase into your lift is the cornerstone of simplicity. We know the obvious benefit (strength) it offers, but there’s another reason I particularly like pause reps: pausing forces you to lower your weight to a load you can handle, thus ensuring strength AND technique are accomplished in unison. I’m a huge advocate of simplicity in my training. Hence, my love for pause reps. Simple... straightforward... productive... and honest.

It’s easy enough to slap on some shoes and grind through a set of heavy cleans. When you have to mindfully pause at the knees without releasing any of your tension and then initiate pull entirely with pure strength, then there’s not a lot of room for interpretation. You can lift the weight or you can’t. Your technique tricks (speed/momentum) won’t help you.


If you want to get strong, take a second and learn to pause.


Pausing forces you to pay attention to your body positioning and the muscles you're activating to lift the weight. This essentially allows you to focus more on your form. Something that is not as easy at full speed.

One of my favorite ways to use pause rep is during my warm-up while using lighter weights, often just the bar. My reason is that it sets the tone for my entire workout. Instead of thinking about everything else going on in my head (upright back, hips move in unison with knees, lats pulling in the bar), I can focus and zero in on my positioning and mind muscle connection.

Another way I use pause reps is within my prescribed workout. This to me is the simplest way to ensure I build some strength, but also work on technique and positioning. On days that are prescribed around 50-65%, I will use pause reps in the clean, jerk, snatch, squat, deadlift etc. I specifically use pause reps at this time as I am using lower weights (we stated that is a must in the text earlier), as well as, the purpose within a training program to work at weights within these percentages is to focus on technique and positioning. I can accomplish strength gains as well if I incorporate pause reps here.


The pauses can also give you a chance to see if you're performing some common mistakes within your lifts, such as having your knees collapse inward or coming too far forward onto your toes.When you slow down the movement and use the pause to stop momentum, you will occasionally witness the imbalances within your snatch, squat, clean etc. and be able to better structure your workouts to work on the weaknesses.

So do you want gains?


Implement Pause Reps in your training and see your strength and performance sky rocket!


Found this helpful? Want to know how to exactly implement pauses in any of the Olympic lifts? Want to hear about a specific topic? Leave a comment below or send me an email! 

Until next week...
Lift it overhead, slam it to the ground and repeat! Practice leads to progression... progression to Gold!


Wednesday, April 24, 2019

Performance Based Nutrition

So... I know last week I said I was going to cover training tips. However, I received a few emails requesting nutrition as the next topic. I am here to educate the readers, so nutrition it is!


LOOKS VS. LIFTS!

Unlike bodybuilders or physique competitors, aesthetics aren't the objective for weightlifters, Thus, the correct diet needs to promote recovery and provide the right foundation for the explosive power required to perform lifts to their maximum potential.

The importance of diet in sport has been recognized for many years, but there has been significant research into nutritional importance in resistance training since the turn of the millennium.
In 2003 Jeff S. Volek, a professor at the University of Connecticut, stated in the journal for Medicine & Science in Sports & Exercise that diet can ‘optimize adaptations to resistance training’ by providing key energy substrates at precise times and by altering the hormonal environment to favor anabolism (muscle synthesis/growth). In short, if you eat the right things, your body will work better. So how does this so called "diet" work?

PROTEIN POWER!

It has been a widely-held belief for some time that protein intake is essential for an athlete, but particularly in resistance training-based sports. A study published in a journal for the National Institute of Health suggests, "Significant increases in 1RM bench press and leg press were observed in all groups after 10 weeks. In this study, the combination of whey and casein protein promoted the greatest increases in fat-free mass after 10 weeks of heavy resistance training." So what is the amount you should be ingesting for optimal performance? According to the National Strength and Conditioning Association, a range of 1.5 to 2 grams per kilogram of body weight a day is optimal.

  
Many athletes try to include a protein source with each meal – whether derived from pulses, whole grains, soy, beef, chicken, eggs, dairy or seafood. Any snacks in between meals should be rich in protein, which helps to repair muscle cells when broken down into amino acids. Whole grains and pulses, as well as green and some starchy vegetables such as sweet potato, are also excellent sources of complex carbohydrates, which will delay the onset of muscle fatigue – an essential step to prevent the body from burning useful sources of fuel, such as protein.

JUST AS YOUR LIFTS, TIMING IS EVERYTHING!

Interestingly, there is also evidence that consuming the right foods at different points of the day has an impact on training productivity. In a article released by the Journal of Nutrition, studies found "protein ingestion before sleep represents an effective dietary strategy to augment muscle mass and strength gains during resistance exercise training in young men." So consuming protein before bed will aid your recovery overnight.


Consuming the right nutrients after a training session, though, is even more important according to a study released by Exercise Metabolism Research Group. McMaster University in Ontario, Canada, state that it is advantageous for athletes to consume fluid, carbohydrates and protein in the “post-exercise period… when re-hydration, refueling and repair of damaged tissues should occur.” Most of the day’s carbohydrates should be taken post-workout to aid in nutrient uptake and proper recovery. However, despite being the body’s main energy source, weightlifting does not require as many carbohydrates as endurance training. Energy is essential for weightlifting, and failing to consume sufficient calories will jeopardize any training sessions.

KNOW THE FATS!

Unsaturated rather than saturated fats should be consumed whenever possible. In a report by Medicine and Science in Sports and Exercise, athletes should consume between 20 and 35 per cent of total calorie intake from fats. Cooking with olive oil, rather than vegetable oils, is recommended by some weightlifting coaches as a source of good fats, as is avocado, fish oils and dark chocolate, to name a few other examples.

WATER UNDER THE BRIDGE?

While protein/fat ratios or recommendations of which type of protein are a specified science unique to each individual, you must never underestimate water. Always ensure proper hydration! You need to drink enough to replace any fluids you lose, so you don't become dehydrated. As an athlete with a large amount of muscle mass, you should drink roughly two-thirds of your body weight in ounces each day, according to PBS.

RULES CAN BE BROKEN

These are guidelines and not hard facts. Remember, every human body is different and there are no strict or unbreakable rules when it comes to YOUR diet! Many weightlifters will indulge in cheat meals every now and then – even those that are at the elite level. As long as you are feeling great and performing to your best abilities, feel free to experiment with these guidelines.

Found this weeks article helpful? How will you implement the nutritional guidelines? Want to learn something specific next week? Leave me a comment or email me directly for more info!

Until next week...
Lift it overhead, slam it to the ground and repeat! Practice leads to progression... progression to Gold!

Wednesday, April 17, 2019

Do you even hook grip?!?


Now its been a few weeks since I introduced the blog, gave insight into the lifts, and laid out how to go about finding programs to adhere to. Over the next few weeks, I am going to cover more detail on the lifts and how to actually execute specific aspects of each. Today I am going to expand on a very important aspect incorporated in both lifts and that is the hook grip! Almost any athlete that goes to the gym can utilize the info I am going to cover in this article! So let's read on!

The hook grip is when an athlete secures the barbell with a hook like configuration using the thumb and fingers. To utilize the hook grip, you need to grip the barbell and place either one, two or three fingers around your thumb. Most people will prefer two fingers placed over the thumb, with the thumb protruding slightly between the middle finger and ring finger. This grip is great for many lifts (cleans, dead-lift, snatch, rows, etc) as the weight placed on the bar is what secures the grip into place... not the muscles of the wrist and forearms. When you first begin, I promise IT IS GOING TO HURT! The pressure is all on your thumbs... the more weight you are pulling/lifting, the more the pressure and pain rises. So you will want to start lighter than usual and progress from week to week, gradually increasing to maximal weight as you are able to bear the pain. Get into the practice of using it now, and it will just be an extra advantage you will learn here.


So why do we really need this? You are already dead-lifting 500lbs right?! Well you are most likely using a mixed grip (one hand over the bar with palm facing toward you, one hand under the bar with palm facing away). That is not a feasible grip when Olympic lifting. The hook grip is important because it helps keep the bar from sliding into the fingertips during the second pull (explosion phase). The thumb helps keep the bar locked in place, thus keeping the bar close to your body during the acceleration that is generated during this phase. It is also important because as you transition from the first pull at shin height to your shoulders or overhead after the third pull/turn over, you arms are not tangled or twisting due to unequal force that could throw off the entire lift. You need a double overhand grip to complete the turn over and get under the bar! So the hook grip solves two problems in one easy set up!

Now when to use and when to go full grip.


The hook grip is typically utilized for lifts below the shoulders. During the clean, the hook grip is most commonly transitioned to a full hand (sometimes just the fingers if flexibility is an issue) when receiving the bar in the front rack. I would never suggest implementing the jerk with a hook grip because, 1. It restricts the movement of the barbell while traveling overhead  2. You are losing power throughout your arms when forcing the bar overhead due to the placement of the hand/fingers. During the snatch, you have the ability keep the hook grip throughout the lift, or you can release the hook grip when completing the turnover just as you are lifting the bar over head. The athlete has to choose which feels more comfortable for themselves. However, don't believe the hype that either way is right or wrong.

Many people attempt to hook grip the barbell but stop shortly after due to feeling as if the hook grip is slipping out. There is a solution to this problem. Tape your thumb like so:


The tape will ensure additional grip for your fingers to hold onto. This is especially helpful if you have smaller hands. Make sure to use tape that is flexible and be sure to only use a minimal amount. You can use athletic tape as I do, or you can go with a more advance and specific tape such as GOAT tape. Also, do not wrap the tape extremely tight as this will cut off circulation and could cause permanent issues to nerves as well as causes excess pain. (not cool bro!)


To get a better idea on how to Hook grip. check out this great Youtube tutorial using a small hand demo. This will help get the idea of the hook grip as well as service anyone who is struggling with the hook grip due to hand size. And if you are someone who struggles with the feeling of slipping barbell or just want to use tape, Check out the video on taping your thumbs for lifts. The only caveat to all the tape is check with the association you potentially could compete with to see rules/regulations on taping. Some federations want to see the thumb tip or knuckle.

Comment below if this helps you in any way! Do you use this for powerlifting, bodybuilding or crossfit? Having an issue I didn't discuss with the Hook grip? Leave me a message and I will reply with any advice I can!

Until next week...
Lift it overhead, slam it to the ground and repeat! Practice leads to progression... progression to Gold!

Wednesday, April 10, 2019

What's all the hype with completing a warm up?

If you are new to Olympic weightlifting (or just working out/training/lifting) then you probably have not clue if you should or shouldn't complete a warm up or which kind if you so choose to complete a warm up. If you rummage through the internet you will find in general three mind sets when it comes to warm ups.

First belief - Mark Rippetoe: Strength and condition specialist and author of Starting Strength states. "No jumping around in the floor, no 100 air squats, no goofy walking, no stretching other than assuming the bottom position a couple of times. Just get warm under the bar, add weight, and squat." He continues, "There is no evidence, in either The Literature or in the objectively evaluated experience of coaches or lifters, that 30 minutes of stretching before a barbell workout is anything other than a detrimental waste of time." In his mind, you would be warm once you put on your pants and get to the gym. No need for stretching or a traditional warm up as it takes away from power output.

Second belief - Mayo Clinic/Most professionals: A warm-up gradually revs up your cardiovascular system by raising your body temperature and increasing blood flow to your muscles. Warming up may also help reduce muscle soreness and lessen your risk of injury. This brief, but specified warm up is built in to the workout to prepare for lifting, bending and repeat use of the muscles and mechanics of the body to prevent injury and increase performance.

Last belief - Crossfit/Olympic Weightlifting: The belief behind these warm ups is to get your body moving/temperature raised, heart rate up, stretch to create "mobility" or flexibility and prepare for a rigorous workout. Typically you will see these athletes utilizing a lacrosse ball or foam rollers to self massage/release myofascial tissue (muscle connective tissue). According to Performbetter.com, athletes "use the roller to apply pressure to sensitive areas in their muscles-sometimes called trigger points, knots, or areas of increased muscle density." Also, the site states, "One would usually use a foam roller to apply longer more sweeping strokes to the long muscle groups like the calves, adductors, and quadriceps, and small directed force to areas like the TFL, hip rotators, and glute medius." The idea according to aaptive magazine is that by foam rolling, you can increase blood flow to the tissues and improve mobility, which aids in recovery and performance. It helps to reduce tightness in muscles so that they can move through a range of motion with ease.

So which should you believe and practice?


You probably think because I am blogging about Olympic lifting and I was so extensive on that one, it is my belief. Well, truthfully I like to incorporate all three to some degree. In my opinion, each have their perspective pros and cons... thus incorporating all of them. But I am not here to discuss all that. What I am going to go over is what I personally do as a certified personal trainer and person with a degree in Health and Human Performance. 

As a general, rule a warm up is just that... getting the body temp up and blood flowing. So the very first thing I do (and some will contest/disagree with part or all of this) is complete 2-3 minutes of exercise for one of the following:
          Brisk walk/slow jog
          Light rowing
          Jumping jacks
          Jump rope
          Elliptical
Once I complete the 2-3 minute exercise I will begin with a dynamic warm up (actively moving through the positions/stretches) of leg swings, arm swings, arm circles, trunk rotations, knee/ankle rotations and hip extension/flexion/rotation.

Next, I go into a very brief static stretch (5 second hold) for each muscle group beginning at the ankles and moving upward all the way to my neck. If I feel extra tightness in my ankles, wrists, triceps, hips or shoulders I will hold up to 15 seconds, but no longer. I am not going to be able to extend my mobility or create a greater range of flexion with these holds. That will take weeks or months to improve. However, I do want to work on getting into position, create a mind muscle connection and decrease the pain reception prior to working out.

After completing these dynamic stretches followed by static stretches, I will then move on to the PVC previously recommended in the blog titled "Equipment recommended?!?" or a barbell. At this point I complete 5 reps of each: hang snatch high pulls, Snatch Grip behind neck OH press, Good morning squats, "shitty squats", Snatch Grip OH Squat, clean grip shrugs, clean shrug to front rack, front squat, split jerk, power jerk and then finally close grip (as close as you can perform comfortably) OH squat.

After completing all of this (I know... time consuming, but very integral) I begin actual lifts with clean pulls, snatch pulls, drop snatch, hang snatch, hang cleans or full cleans (depends on prescribed exercises) with the barbell moving up in weight every three good lifts until I reach working weight (weight prescribed in plans for that day). And -NOW- you are ready for the true workout!

To get a good idea of what a traditional warm up looks like, take a look at this warm up for Olympic Weightlifting video. Or if I get enough comments or inquiry, I will put a video together and post it for you to see first hand my exact warm up.

I hope this helps get you physically and mentally ready to lift as well as prevent injuries. If you have questions such as what exercises to incorporate into the dynamic stretches, what static stretches to implement, weight to use etc., please leave a comment and I will address it ASAP!

Until next week... lift it overhead, slam it to the ground and repeat! Practice leads to progression... progression to Gold!


Wednesday, April 3, 2019

To buy or not to buy... these are the accessories!

The natural progression of this blog is to get into accessories you COULD use for Olympic weightlifting. Do you need these to lift? Hell no! Would you benefit from utilizing these? F*@k YES!

The first and foremost item I would highly recommend are weightlifting shoes also called lifters. I prefer Adidas, but as long as you get a heel that is 15 mm (0.6 inches), you should be good to go. The purpose behind getting a lifting shoe you may ask. "Weightlifting shoes have a lifted heel, which will increase the ankle's range of motion, or the ability to stretch the Achilles," says Lisa Reed, C.S.C.S., owner of Lisa Reed Fitness. So if you have a hard time sitting all the way down into a squat, they could help you achieve greater depth. "They also allow for hip flexion and extension in all of the Olympic movements," adds Reed, meaning they help you move through the full range of motion required for powerful lifts like squats, cleans and snatches. I would suggest getting some shoes from either Roguefitness as they have a pretty good array, or going with Amazon. If you want to splurge, look badass, and/or feel legit; I would then recommend getting a custom pair put together by BStreetShoes. The craftsmanship this guy produces is unparalleled! Below are a couple of pictures to give you a glimpse of what this man is capable of.

The next extremely recommended item is chalk as it provides a more natural boost to grip without constricting the wrist (as opposed to lifting straps) and allowing the muscles in the forearm more complete extension and flexibility. Chalk also helps ensure that your hands don’t get sweaty, which will compromise your grip and decrease your workout’s effectiveness. Now the type of chalk you choose is up to you. you can go old school and get a block, go with a chalk ball, or go progressive and get liquid chalk. Each has it's own pro's and con's, but ultimately you should be using a form of it every time you lift the barbell.


Going into things that are useful, but not mandatory or extremely encouraged would be wrist wraps. Instead of your wrists being bent wrong, fatiguing, or straining; wearing wrist wraps will actually help to keep your wrists stabilized, tight, and secure so that you can lift and target the muscles you want to focus on instead of your wrists taking all the strain. Perfect application is in the overhead squat. You will be pinning your arms overhead for up to a minute or two and need a lot of support for all that potential strain. I absolutely love my HookGrip wraps. You can go with the simple yet more secure wraps such as rogue, bear, or schiek found at Roguefitness or go with more of a traditional Olympic version with the tie closure seen on the hookgrip version. Its suggested to give the lifts a try without the wraps and build your tolerance, but utilizing them for heavier lifts. Myself... I have weak wrists therefore I use them quite frequently while performing snatch, cleans and and pressing movements. The key is to not become dependent on them.


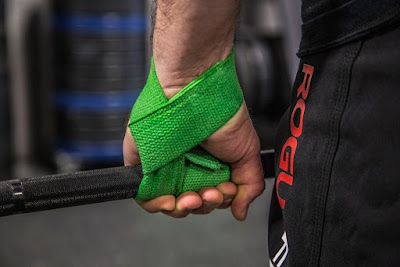
On the topic of wrist wraps (seen above) is an item that frequently gets confused with wrist straps (see below). Wraps obviously wrap your wrist and assist with stability of the wrist joint. Wrist straps help grip the bar tighter, and complete lifts at loads unable to complete with a hook grip. I am not creating a whole category for straps because some lifters utilize their wraps to help with this demand. However, it wouldn't necessarily be a complete list without at least including the straps. I have a couple different variations of straps myself from my power lifting days. When pulling massive weight, you sometimes lose your grip, so you add straps to lock yourself into the barbell. On days I have snatch grip deadlifts or a clean pull variation at maximal weight, I will complete as many reps/sets as I can before strapping in. Again, not a huge issue to not have these and you really do want to build your grip strength and utilize your hook grip as much as possible. So not a big need, but can be useful at times.


Moving on... the next big item you may see in the gym, online or in advertisements would be knee sleeves or wraps. I personally only use these for squats and maxing cleans. However, some people have more stability in the knee joint, while others aren't as fortunate. If you have discomfort in squats, cleans, lunges or knee tracking is off when reviewing your lifts, maybe try sleeves or wraps. I have a few different sets and honestly don't have a preference or recommendation here. I would get a cheaper pair to begin with and see if they work. If you like them, you can go with a thinner, thicker, more aesthetically pleasing etc pair. I have these (below pic) just because they look nice and match a lot of my gear since the reverse/inner stitching is black and red.


The last recommended item would be a few resistance bands. These will help get you through a dynamic warm up, stretch, or do a few exercises/accessory moves to build speed, strength or technique. These bands by Oleksiy Torokhtiy are great for dynamic warm ups and overall training. Another option would be a few closed loop type of bands to help with other training assistance such as 5lb, 10lb and 15lb set. Using these can help open up shoulders, build strength in the over head position, add resistance with lifts etc. If possible, buy both the Oleksiy band and a few close loop bands. This will really give you a great variety to complete progressions of training. 

  
There you go... figure out what you may or may not want or need and go get it! Not a single one of these are mandatory, but if you were to buy only one, get the damn shoes! This will improve your lifting technique and output more than any other item I or anyone else could recommend.  

Have questions how to use any of it? Need to know a brand or an exact series I use or recommend? Leave me a comment and let me know. I may just write about it next week if it is a damn good question or recommendation! 

Until next week... lift it overhead, slam it to the ground and repeat! Practice leads to progression... progression to Gold!


Wednesday, March 27, 2019

Get to work!

Since I have covered the overview of the main lifts, and what equipment is necessary to train... I think it's only necessary we begin to look at the training programs as well as how to decipher what the F@#k its saying.


I would highly recommend starting off with a FREE pre-made program if you are new. If you are really uncertain as to whether or not you will stick to Olympic lifting, maybe try this 8 week program by Elitefitcross. I will warn you however, since it is only 8 weeks long, it is a bit more demanding. If you have previous lifting experience and your are confident in your strength, this may be for you! However, if you are a little shaky, or you know you will stick to a program for the long haul, I highly recommend the 12 week program laid out by elitefitcross. This program is a bit slower pace with less demand on the body. Yet it will give you great confidence in the end and you will see your personal bests (PB) go up guaranteed!

Last item concerning programming, if you have previous lifting experience, are a personal trainer or have a friend who knows the ins and outs of the training principles, look at this page by TrainHeroic to create your own program.

NOW... to get down to business and decipher the codes written within these programs.

Most lifting programs are based off your single, heaviest lift one time noted as 1RM. When you view a program it will state something like:

Squat @ 80% 3x2.

This essentially means, if your squat 1RM is 100 pounds, you would Squat 80 pounds. If you were to say squat 300 pounds as your 1RM, you would essentially need to squat in this scenario 240 pounds. To find this number easily, input in your calculator your 1rm x.8 (100 x 0.8 = 80) and its that simple. Math made easy right?! Now to the remainder of that statement... the 3x2 section. This is telling you in the first number the amount of reps (times you complete that exercise without stopping) and then the amount of sets (number of times you complete the reps with breaks in between) in the second portion. So it kind of reads like this: Exercise (squat) at weight (80 pounds) - reps (3) for number of sets (2). So you would complete a set of squats with a weight of 80 pounds for 3 reps, rest and complete a second set of squats a 80 pounds for 3 reps to complete the prescribed workout scheme.

To further complicate the equation you will sometimes see a workout prescribed such as this:

Power Clean + Front Squat + Push Jerk @ 80%  (1+1+1) x 5

This is telling you to: Power clean the weight once, go directly into a front squat once, then complete a push jerk once to complete a single rep. Thats the (1+1+1) summation. then you will complete that sequence 5 times according to the statement/prescribed workout.

One last thing I want to throw out there because lets face it... it is Olympic weightlifting and the sport is enjoyed in more areas of the world than the US. Sometimes you may come across a program that has the actual weight involved instead of the percentage of your 1RM. Keep in mind it may be in kilograms. To easily convert kilograms to pounds you use a simple equation utilizing a factor of (2.2). To keep it simple, I will show what 100kg converts to and then back. (100kg x Factor of 2.2 = 220 pounds) So 220 pounds equals 100 kg (roughly). To convert the other way, just devide by the factor of (2.2). So 220 pounds / 2.2 = 100 kg. Lets give it a try with harder numbers. Lets take 300 pounds. 300 / 2.2 =136 kg or 115 kg x 2.2 = 253 pounds.


I hope all this is making sense. I know if you are new to this, it can be daunting. My recommendation is to work with someone who is a gym goer already. They don't need to be Mr Olympia or a world record holder to get you going. Just someone who has a few months in the gym and has followed a fair share of workouts.

Now its time to test your 1RM in the Squat, Deadlift, Over-Head Press, Push-Press, Snatch and Clean+Jerk to determine your program requirements. Remember a 1RM is not how much you can grind out while throwing caution to the wind. It is the 1RM you can safely and effectively lift without injury or S#!t form. For more references on how to properly perform these lifts, I would peruse Youtube as they have thousands of videos that will guide you to proper lifting techniques!

Have questions as to how to start after reading this? Not sure about the math when inputting a specified weight? Send me a msg or comment below. No worries, I will get back to you! And as always... stay safe, but crush your goals!

Wednesday, March 20, 2019

Equipment recommended?!?


Today I am going over whether or not to go to a commercial gym or build a home gym. I will give a few examples of what the pro's and con's are of both.Hopefully by the end of this, you will have a better idea as to which route fits your needs AND know what type of equipment you will need to perform the lifts!

Ensure to weigh your options before committing either way!

Commercial Gym route:

If you live in a large city or the suburbs, you most likely have access to many commercial gyms. However, most commercial gyms will have only the machine weights and some barbells with iron plates. You absolutely cannot drop iron plates! 

If you do have a gym or two locally that have bumper plates, you can always give the gym a trial and see how you like it. Some gyms are more accommodating (platforms, high temp bumpers, chalk or able to drop weights) with the Olympic lifts than others, so asks as many questions as possible before signing up for a membership. You possibly coudl be lucky enough to have an actual weightlifting gym in the area. If at all possible, try these out as they will have the equipment as well as the instructors to lead you to success at a much faster rate! Some  downsides are that you may have to wait for the platform to open, the weight to perform at your percentages may not be available or that the barbells are trashed/bent from people doing ridiculous things with them. Another glaring downside to commercial gyms are the fee's. You pay to have a monthly membership, the quarterly or semi annual dues and then any instruction fees. This can begin to get costly really fast!

Home Gym:

With a home gym you create the rules, play your music as loud as you want and have no restrictions to equipment. However you have to have the space and the finances to support such an endeavor. 

The following list is what I would consider essential garage gym equipment for Olympic lifting.

PVC Pipe 7ft in length

You should *absolutely* invest in a PVC pipe -- ESPECIALLY if you are new! This will help dial in your technique, build your muscle memory and not kill your shoulders and wrists with the weights you're not ready to handle.  


Barbell

You can’t just use any old barbell for Olympic weightlifting. A special Olympic lifting style barbell is what you need to have. This type of bar is important because:
  • Whip (the ability to store elastic energy and create a bend without breaking). As you progress you will begin to use this to your advantage!.
  • Smooth rotating sleeves. This allows the weight to rotate as the lifter rotates the bar in the pull.
  • Olympic bars are purposely built to able to take repeated drops from overhead.
Here is what I recommend on the high end as well as the cheaper but still high quality. There are hundreds of bars out there if you do your research, but its ultimately the number one thing in your arsenal... make it count!

Bumper plates

As I eluded to earlier, you can’t use any plates laying around for Olympic weightlifting. Bumper plates are essential because:
  • They were made to be dropped, beaten and battered! They are specifically designed to withstand the ‘abuse’ of regular drops from overhead heights! Any other types of plate (iron or polyurethane) will cause damage not only to the plates, but also your barbell and/or your floor!
  • Most Bumper plates are all the same diameter. The diameter of a traditional bumper plate is based off the 25kg bumper height. Iron plates tend to all be different sizes. If you are just starting out you should not be starting with the 25kg plates, so bumper plates let you set up at the same height even when utilizing lighter plates.
  • Bumper plates are also traditionally color coded for easy identification/math. RED usually is 25kg/55lbs, BLUE is 20kg or 45 lbs, YELLOW is 15kg/35lbs, GREEN are 10kg/25 lbs and black are kind of the step children of the bunch rounding out 2.5kg/5lbs, 5kg/10lbs and sometimes even 7kg/15lbs.

Here again are high end and cheaper sets.

Flooring

This is very important aspect to consider for your home gym. First, you have to decide what sort of ‘platform’ you want. You don’t need to have an actual platform. But I personally love having a designated area for those lifts! Consistency is key as you will find out with lifting in the months to come! I do however, have my lifting area/garage gym covered in horse stall mats. Underneath my platform, I have continued the horse stall matting as well to prevent further damage to the concrete. It also lessens the abuse on the bar and weights as well as keeps things a bit more quiet when dropping those weights. Using horse matting is certainly the cheapest and in my opinion the best way to go!! You can find it at a local hardware store or a farm equipment/tractor supply type store.

Squat rack

Squatting is the building blocks of Olympic weightlifting. You will be squatting regularly in almost every program you will ever follow! For beginners, I recommend a set up like this instead of the full rack. This will help with grip width, but still give you stability and arms to catch missed/too heavy of squats to recovery when you attempt your one rep max.

There are other items you will use to perform the lifts (accessories), but as a garage set up these are the essentials!

Did I miss anything? Please comment and let me know! I will add in any great suggestions.

Wednesday, March 13, 2019

What is Olympic weightlifting?


Olympic Weightlifting:  the sport in which you attempt to lift a weighted barbell over head three times, in one of two ways, to combined the two best attempts into a total score. 

First is the snatch: The athlete approaches the bar with an athletic stance, grips the bar utilizing a wide grip while in a squatting position to begin. The initial pull is to the knees and resembles a deadlift. 

The second pull is from the top of the knee to the hip with a great emphasis on Triple extension (hip, knee and ankles) and pulling the bar up with the elbows high and wide.

The third pull is where the athlete forcefully lowers themselves below the bar and "punches" up to lock the bar overhead while in a overhead squat position.

After the three pulls have been completed, the athlete will then stand up tall with the bar overhead and elbows locked out for a completed lift.

Check out this quick video to see the Snatch performed by Oleksiy Torokhtiy
 https://www.youtube.com/watch?v=UBc5N_-xdqo

The second  lift is called the Clean and Jerk: The athlete takes an athletic stance and grips the bar just outside the thighs and is in a position where the shoulders are higher than the hips and the hips are higher than the knees. The initial pull also resembles a deadlift and is to the knees. 

The second pull is from the top of the knee to the upper thigh. The athlete will forcefully shrug the bar up utilizing the shoulders through the use of triple extension (ankles, knees and hips). During this moment the athlete will simultaneously lower themselves under the bar to receive (catch) the bar in a front squat position. 

The athlete will stabilize themselves before standing up tall with the bar across the front delts with elbows high.   

Then the final drive will begin with the hips and knees slightly hinging. The athlete will forcefully change directions pushing through the bar in an upward direction while driving the feet apart and into a split position (feet approximately shoulder width apart and resembling a lunge). The lift is completed when the athlete has the bar completely overhead with elbows locked out.

Check out this quick video to see the Clean and Jerk  performed by Oleksiy Torokhtiy
https://www.youtube.com/watch?v=9HyWjAk7fhY

Traditionally the competitions are calculated and recorded in kilograms. The athlete attempts each lift three times and takes the best of each lift to combined them into a total score.

Leave me a comment below letting me know if you liked my explanation or if I could elaborate more. 

Comment on what topics concerning Olympic weightlifting you may want to read about.  

Or just let me know if you dropped by my Instagram @eliteNRG. ꜜ


Check out some of my lifts on Instagram for more references: